
|
Accessioning |
|
Appraisal |
|
Materials Preparation |
|
Naming Conventions |
|
Documentation Finalisation |
|
Summary Steps |
|
Glossary |
Maps - Sectional Cataloguing Reference Guide |
|
Map Acquisition and Cataloguing Workflow
Currently the Map
Acquisitions
and Cataloguing
Team are only cataloguing/preserving electronic materials which are
selected by Division 2 map staff. Stand alone CD’s
are not
covered by Legal Deposit at this stage, however, pending Commonwealth
legal deposit legislation, these items can be voluntarily deposited via
negotiations with publishers and creators. Where publications
in
these formats cannot be obtained on voluntary deposit, or where
multiple copies are required, consideration may be given to
purchase. If 2 copies of an electronic item is received copy
1
will always be selected for preservation. Where information contained
within a physical
format publication also exists in a print version, the Library does not
intend to preserve the physical format publication except where
additional flexibility of use is provided by the electronic
version. Where both online and physical formation versions of
a
publication are available, the Library prefers to preserve the online
version. Where there are significant differences between the
versions, both or all will be preserved. (as stated in
‘Preserving Australian physical format electronic
publications
– selection guidelines’ NLA Web) When an item is electronically
preserved, it is
the information content that will be preserved rather than the actual
physical item. The physical item will be retained and housed
in
the appropriate stack location with other physical format materials
i.e. MAP Nmt run. Workflow
guideline
The following is a workflow
guideline for the Map
Acquisitions and Cataloguing Unit. The Prometheus
‘User
Guide’ (available through Prometheus) should be consulted for
more detailed user instructions in addition to other functions of the
workbench such as transferring jobs and capturing non-optical media
such as USB drives. Standard procedure will be to
preserve the
digital material at the same time it is being catalogued i.e.
we
will not stockpile Nmt material for preserving at a later date. Material
with an accompanying disc
Where there is an accompanying
disc - Catalogue
the printed map (monograph) as you would normally and add the following
fields: 300
1
map : col. ; 24
x 30 cm. + CD-ROM 538
System details The standard minimum system
requirements note
would be “System requirements: PC/Mac with CD-ROM drive,
standard
web browser.” However,
check item information for any other requirements needed to run the
program. Please refer to the Prometheus
– User’s Guide
for more examples of System Details and File Formats for what is often
found on
software packaging, technical specifications or Installation notes. Enter the System Details and File Format
information as an
Annotation
to a Job’s Part within Prometheus.
530 - -
$a
Selected digital files also available on the internet, address
as at xx/xx/xxxx (date), http://www.
etc 856 4 -
$u http://www.
etc Step by Step Guide1. Log
into Voyager 2. Log
into Prometheus 3. Find
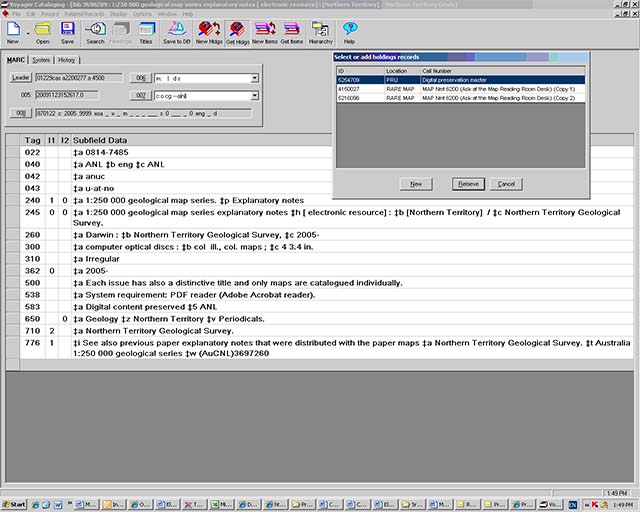
the relevant item in Voyager a. Check
that system requirement notes
are in the 538 field. If not there, then add them to the record in
Voyager. b. Open
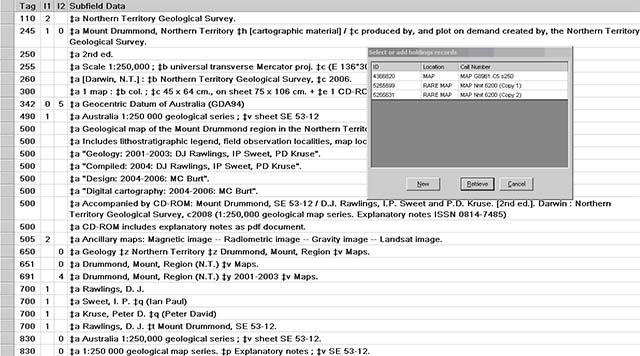
the holding for the item that
is going to be archived (if there are
two holdings always select copy 1) 4. Go
into Prometheus 5. Create
or find
job 6. Enter
the Bib. ID for the item 7. Preview
details and check that
system details are correct 8. Click
on drop down menu and select
the choose holdings box 9. Select
the correct MAP Nmt line 10. Select Check for existing jobs (Message displays – No jobs exists) NOTE:
If one or more Jobs do exist for a catalogue record a decision
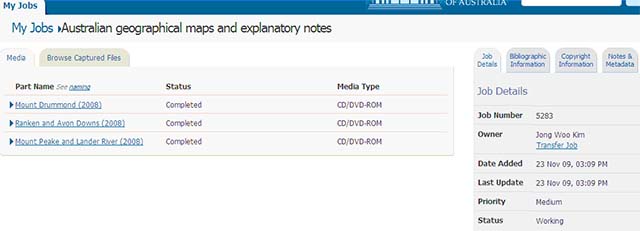
will have to be made as to whether to: or 11. Add job name in the Enter name of new job box. The job name will depend on what type of maps or information is in the electronic item. For Australian items use these
titles only:
NOTE: If your electronic item does not cover the above types notify your supervisor who will add more titles. For overseas titles use the title as it appears in the 245 of the Voyager record (both title and subtitle) For example:
12. Click
on Create new
job 13. Click
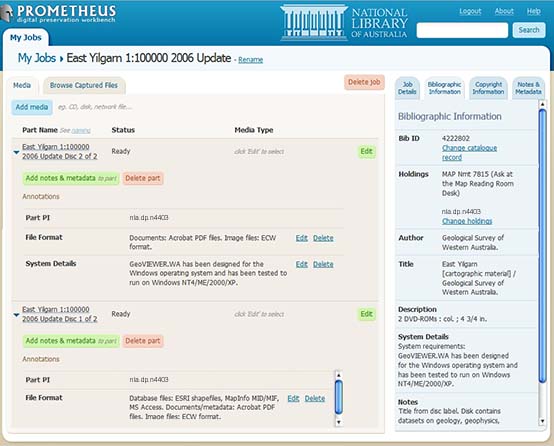
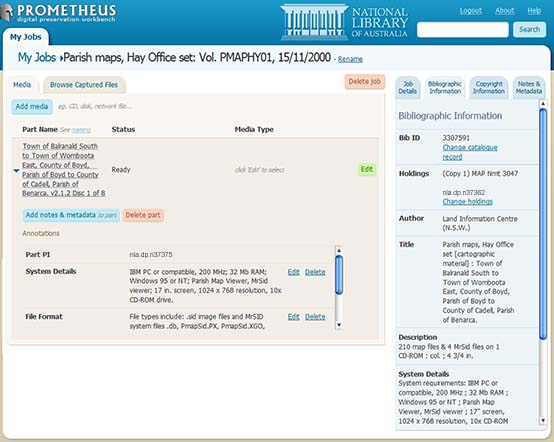
on Add media 14. In the Enter name of part box, name the part for both overseas and Australian items as it appears in the 245$a of the Voyager record + edition or volume or date of publication + no. of disc (if multiple discs) e.g.
If there are multiple physical parts with the same title, add Disc 1 of x for example, to clearly identify these separate digital objects. If there is more than one disc and each disc has its own unique title, there is no reason to give the disc a number. For overseas items the title as it appears in the 245 will be used for both the Enter name of new job box and the Enter name of part box (+ edition or volume or date of publication + no. of disc) e.g.
Add notes and metadata to the part * NOTE: Any system details as seen on the Bibliographic tab reside only in Voyager not Prometheus! They have been displayed there to make it easier to verify the correct record and to enable users access to an easy cut and paste option for transferring of the File Format and System Details from Voyager into Prometheus.
15.
Click on
Edit > then Choose Type
(to
select correct icon for
the Part's media carrier type) eg. CD/DVD-ROM, External Hard Disk or
USB, File (single) or Floppy Disk (3 1/2"). Note: For collection
material
supplied on USB Flash/Thumb drives please refer to the
Workflow section 9
- Capturing non-Optical Media for the
procedure to select the USB flash memory drive. All contents of the USB
Flash Memory Drive will be copied into Prometheus. 16. Save
>
Capture 17. Select
appropriate CD/DVD drive and
insert electronic item into the mini juke box for optical discs. For
USB flash memory drives use the Browse function to navigate to the
USB flash drive location on your computer. Note: Occasionally USB flash drives
may be 'hidden' by exisiting mappings of NLA network drives. Should
this occur please contact the Digital Preservation Helpdesk for
assistance. 18. Close 19. Status
will display
as
‘Initialising’. Allow
system
to copy and status reads
‘Complete’. Timing
Notes: Initializing; a pop up window of file types will display which can be closed; imaging (can take up to 10 minutes); copying (approx. 2 minutes); completed; pending (approx 2 minutes); analysing (approximately ? minutes); completed. Stub - If a Part is unsuccessfully processed If a Part fails to process
correctly, an error will be flagged and the user is given the option to
Restart the process. The ERROR
status text message is a hyperlink and upon clicking upon it will
display a pop-up dialogue window detailing the cause of the error along
with suggested actions that user can take to rectify the problem. It
also offers the user the option to Restart the task. The points that one can recover from an error and
proceed are: If this course of action still fails to rectify the situation, there are two other options. • Record the DPW failure error for a a physical carrier within it's Part, as a Stub. Click on the title of the Part, as per Annotation, and select 'Mark Part as a Stub. You will be prompted to enter a reason. To un-stub a part, click on 'Unstub Part'; or • Transfer the Job to Digital Preservation [digipres] along with the physical media.
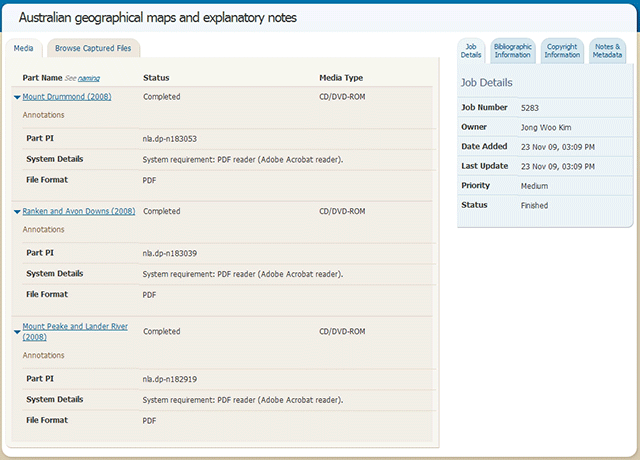
This removes the media content from the Part and thereby enables progressing the remainder of the Job to completion. The failed Part can then be attempted again as a separate Job but allowing all the other Parts of the original Job to be successfully ingested in the interim. Note: Should one 'un-stub' a Part, it will need to be recaptured before being able to mark the Job complete as the original content has been deleted when making it a stub. If the material is still not processable the Job will not be able to be Marked Completed. 20. When all parts have been added, uploaded, analyised and prepared for storage, the Mark entire job complete button will become visible. 21. Review all the Parts and their associated System Details and File Format metadata annotations. These annotations will often be different for each Part. See Figure 5. 22. Then 'finalise' the job by clicking on Mark entire job complete button, a confirmation dialogue box will appear and click again on Mark complete button to confirm submission of the job to the digital repository’s Ingest Service. If archiving retrospectively lot groupings of electronic items, eg. Parish maps or serials you can leave the job open briefly until the collection is completed. Complete catalogue record and add new holdings line (Voyager)23. When
preservation is
completed, the bib record and holdings need to updated to be complete. 24. Add 583 tag to the bib record if not already present. 583 - - $a Digital content preserved $5 ANL 25. Add new holdings record (in addition to existing Nmt holding for the physical item in the stacks) – but no item record is needed. 852 8 - $b PRU $h Digital preservation master End processing26. Place the disc into a Preservation supplied CD case, if one has not been provided.
27. Attach a call number label to the front of the CD case in the bottom left corner 28. Affix Prometheus Ingested sticker to the spine of the case to indicate that it has been digitally preserved in Prometheus.
MAP
Naming Conventions
When uniquely identifying Parts of a Job, please use Title Case: GeoMAP. Version 2009 (Disc 1 of 3) Limbunya, Northern Territory (2005)
If there are multiple discs with the same title, add Disc 1 of x, to clearly identify these separate digital objects. If there is more than one disc and each disc has its own unique title, there is no reason to give the disc a number. Examples |


